전체 소스코드
https://github.com/GHGHGHKO/Springboot/tree/main/pepega_chapter_2
GitHub - GHGHGHKO/Springboot: 블로그에 업로드 된 소스코드
블로그에 업로드 된 소스코드. Contribute to GHGHGHKO/Springboot development by creating an account on GitHub.
github.com
이전 포스팅에서는
위 웹사이트에서 프로젝트를 만들고
실행해보는 실습을 했다.
localhost:8080으로 접속하여
서버가 작동하는지 테스트했다.
이번 포스팅에서는
HelloWorld를 만들어보려고 한다.
java는
src/main/java 하위에 package들을 생성하고 진행한다.
Package란?
java 라이브러리들 간의 충돌을 막기 위해
class들을 구분하기 위한 방법이다.
예시로
package com.example.pepega.helloworld.java;
package com.example2.pepega.helloworld.java;
클래스 이름(helloworld)은 같지만
package 이름이 다르므로 다른 class로 구분된다.
java는 수 많은 라이브러리를 import 하기 때문에 이름만으로 class를 피할 수는 없다.
대신, package를 계층적으로 구성하여 class간 충돌을 방지한다.
@SpringBootApplication
SpringBoot에서는 @SpringbootApplication (annotation이라고 한다.) 선언만으로
대부분 설정이 자동으로 이루어진다.
하단은 boot실행을 위한 Application 설정 파일이다.
start.spring.io 에서 패키지를 실행하면
하단처럼 기본 소스가 제공된다.
package com.example.pepega;

import org.springframework.boot.SpringApplication;
import org.springframework.boot.autoconfigure.SpringBootApplication;

@SpringBootApplication
public class PepegaApplication {

	public static void main(String[] args) {
		SpringApplication.run(PepegaApplication.class, args);
	}

}
application.yml
resources 우클릭 -> New -> File 클릭
application.yml
이라는 이름의 파일을 생성한다.
처음에는 아무 내용이 없으므로
하단처럼 port를 지정한다.
server:
  port: 8080
1024번 포트 이하는 특권(privileged) 포트로 지정되어 있어 root 권한으로만 사용할 수 있는 port이다.
이제 controller 라는 package를 생성하고
하위에 class를 생성할 것이다.
Controller는 Spring에서 클라이언트 요청의 진입점이 되는 Class라고 보면 된다.
예를 들어, 회원가입 요청을 생각하면 된다.
controller 안에 HelloController 를 작성한다.
package com.example.pepega.controller;

import lombok.Getter;
import lombok.Setter;
import org.springframework.stereotype.Controller;
import org.springframework.web.bind.annotation.GetMapping;
import org.springframework.web.bind.annotation.ResponseBody;
import org.springframework.web.bind.annotation.ResponseStatus;

@Controller
public class HelloController {

    /*
    1. 화면에 helloworld가 출력된다.
     */
    @GetMapping(value = "/helloworld/string")
    @ResponseBody
    public String helloworldString() {
        return "helloworld";
    }

    /*
    2. 화면에 {message:"helloworld"} 라고 출력됩니다.
     */
    @GetMapping(value = "/helloworld/json")
    @ResponseBody
    public Hello helloworldJson() {
        Hello hello = new Hello();
        hello.message = "helloworld";
        return hello;
    }

    /*
    3. 화면에 helloworld.ftl의 내용이 출력된다.
     */
    @GetMapping(value = "/helloworld/page")
    public String helloworld() {
        return "helloworld";
    }

    @Setter
    @Getter
    public static class Hello {
        private String message;
    }
}
@Controller
Spring에 해당 Class가 Controller 임을 알려주기 위해 class명 상단에 @Controller를 붙여준다.
@GetMapping("RequestURI")
GetMapping을 붙이면 해당 주소의 Resource를 이용하기 위해서
Get method(get, post) 로 호출해야 한다는 뜻이다.
http://localhost:8080/helloworld/json
웹 브라우저에 위 주소창을 실행하면 Get방식으로 호출된다.
/helloworld/ json을 Mapping하고 있는 메서드( public Hello helloworldJson() )가 실행된다.
@ResponseBody
결과를 응답에 그대로 출력한다는 의미다.
@ResponseBody를 지정하지 않으면 return에 지정된 "helloworld" 이름으로 된 파일을
프로젝트 경로에서 찾아 화면에 출력한다.
@Getter
@Setter
선언되어있는 변수를
알아서 Getter, Setter(lombok)가 되도록 지정해준다. (편함)
서버 실행
PepegaApplication 클래스로 이동하여
좌측의 녹색 세모 버튼을 누른다.

그럼 위처럼 나오게 된다.
Spring Security를 추가하여 위같은 페이지가 나오게 된다.
Username : user
Password : Run 페이지에서 확인
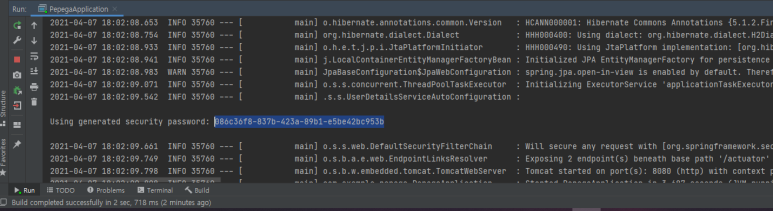
원래는 로그인 페이지를 만들어야 하지만 우선 위 패스워드를 입력하도록 하겠다.
로그인이 됐으면 각각의 테스트 주소를 실행한다.


/helloworld/page GetMapping을 보면
ResponseBody가 지정되어있지 않다.
return 된 "helloworld" 라는 파일을 찾아 출력해야하는데
파일이 없어서 오류 페이지가 나온 것이다.
/*
    3. 화면에 helloworld.ftl의 내용이 출력된다.
     */
    @GetMapping(value = "/helloworld/page")
    public String helloworld() {
        return "helloworld";
    }
helloworld.ftl 생성
templates 디럭터리 안에
helloworld.ftl 파일을 생성한다.
내용은 HelloWorld를 입력한다.


원래 되야되는 걸로 알고있는데
Intellij에서 지원을 안하는 것 같다. (build.gradle 에 추가했는데도 안되네..)
되는 분 있으면 댓글 달아주시면 감사하겠습니다.
=================수정=======================
Intellij Community 버전에서 ftl 파일 지원이 안되는 줄 알았으나
정상적으로 지원하는 것으로 확인됐다.
ftl 혹은 freetemplate 형식의 파일 실행하는 법을 추가하겠다.
application.yml 에 하단 내용을 추가한다.
spring:
  freemarker:
    template-loader-path: classpath:/templates/
    suffix: .ftl
build.gradle 에 하단 내용을 추가한다.
implementation 'org.springframework.boot:spring-boot-starter-freemarker'
정상 작동 된다.

다음은 H2 Database를 활용하여
데이터베이스와 springboot를 연동해보도록 하겠다.
출처
https://daddyprogrammer.org/post/41/spring-boot2-helloworld/
SpringBoot2로 Rest api 만들기(2) – HelloWorld
이번 시간에는 앞 장에서 실습한 프로젝트를 기반으로 HelloWorld를 만들어 보겠습니다.java code 개발은 src/main/java 하위에 package를 생성하고 진행합니다. package란? java 라이브러리들 간의 충돌을 막
daddyprogrammer.org
https://github.com/codej99/SpringRestApi
GitHub - codej99/SpringRestApi: SpringBoot2, SpringSecurity, JWT, Stateless Restful API
SpringBoot2, SpringSecurity, JWT, Stateless Restful API - GitHub - codej99/SpringRestApi: SpringBoot2, SpringSecurity, JWT, Stateless Restful API
github.com
'SpringBoot' 카테고리의 다른 글
| springboot로 Rest api 만들기(6) ControllerAdvice를 이용한 Exception 처리 (0) | 2021.10.22 |
|---|---|
| springboot로 Rest api 만들기(5) API 인터페이스 및 결과 데이터 구조 설계 (0) | 2021.10.22 |
| springboot로 Rest api 만들기(4) Swagger API 문서 자동화 (0) | 2021.10.21 |
| springboot로 Rest api 만들기(3) H2 Database 연동 (0) | 2021.10.21 |
| SpringBoot로 Rest api 만들기(1) Intellij community, start.spring.io (0) | 2021.10.21 |